

Plasti dip is a relatively new rubberized coating that is used to change the color of the car without the hassle of electromotive paints. It is generally a liquid form that can vinyl wrap the car or simply could be sprayed like other paints.
These new products not only protect the inner layer of paint but also protect the appearance of the color and trim by being resistant to the relatively high temperature and extensive direct sunlight. Attributing quality of plastic dip is it could be peel off at any time you want, so you can change your car appearance anytime.
Decide A Good Location For Painting The Car
The location where you are supposed to do your paint job matters as the essential point.
There should have ample ventilation, as the alcoholic fumes will be mixed with air and can irritate you if you are inhaling the same air. Your place should be covered in a manner that your car won’t have the direct sunlight, as it will make the paint dry too fast with the uneven coating.
Your place should have good lighting as it will help in retaining the coating more evenly. And your place should be free from space so you can easily move and do your work. Your place should keep your car safe from the sticking of debris and dust particle in your car when the coating will be wet.
Prepare For The Materials
The first thing is to pick a color of your plasti dip and ask your supplier how many gallons are required for your plasti dip. If you are just thinking of plasti dip specific parts of the car, then the amount of plasti dip would b small.
As there are mostly the sellers that sell the prep kit in which you will find each and everything that you’ll need with the gallons of paints, paint sprayer and the aftercare kit.
You should also prepare things that will help you out in case of damage to the car, sandpaper or orbital sander would work great in removing the rust. Painter’s tape, pair of gloves, and a mask or respirators are also being needed.
Prepare The Surface For The Plasti Dip
The first step is to prepare your car or its surface on which later the plastic dip will introduce. Initiate your work with suspecting the rust if anywhere is located, it would be of no use to plasti dip a rusted area as it will not protect that area. First, remove the rust from the surface with the help of sandpaper or orbital sander.
Secondly, check your car if it has any imperfection or uneven surface than by using an auto primer makes the surface even because before plasti dip the thing important is the clear, smooth surface as the plasti dip adheres more efficiently on a smooth surface.
Clean Wash And Dry Your Car
As said before, the plasti dip adheres to the clean and smooth surface so, it is also necessary that the surface should be free from all types of debris, oil particle and dirt.
You can remove them by washing your car, wash your car with soap and try to use a lamb’s wool mitt or any other material soft like this for rubbing the car, as it will help to prevent scratching on the car surface. Rinse the soap with water.
Before drying, give one smooth cover of alcohol with any spare cloth. This will help you in removing the oil particle if any. The most important thing is to dry your car completely, give about 3 hours to your car in drying and then sustain that your car is completely dried as the wet surface is the most unsuitable thing we need.
Cover The Surfaces You Don’t Want To Dip
The first thing to cover with the help of newspaper and painter’s tape is your windshield, your windows, and your mirrors because it should not be painted. If you break them, we suggest you to use the Armormax technology windshield and windows. You can cover your tires with the help of trash bags.
Some owners do not cover the surfaces that are not supposed to dip with a reason of peel off nature of dip, and yes you can peel off the dip afterward from where you do not want the dip, but it is not the ideal situation as you could be facing the problem that you’ve to peel off more than you need.
So covering before applying the plasti dip is ideal. Covering can be done by using newspaper on the wider surfaces and supporting them with the painter’s tape.
The lights and emblem can also be painted and could be peel off with the help of precise cuts around them.
Preparer For Your Plasti Dip
Get your plasti dip product and read the instructions for mixing and preparation of dip. It is ideal for pouring the dip in a big container so, it will b more convenient to mix the product with a thinner. Use the paint stirrer to mix the contents evenly and properly.
You’ll need a high volume, low-pressure paint sprayer by which you will apply the dip in your car. There you’ll find measuring lines that help you in pouring the exact amount of prepared solution of a dip in it which could be handled easily.
Get ready with your sprayed by pressing a little and holding the sprayer, distanced from your car. So, the paint will draw to the pipe.
It is important to keep in mind to shake or stir the content for a minute before using, so the content would be evenly mixed.
Also be prepared in mind to where you are going to dip the first, if you want your tires to be dipped so first isolate your tires from your car then dip it, if you want to dip the emblem, grilles or trim pieces then to you have to isolate them first.
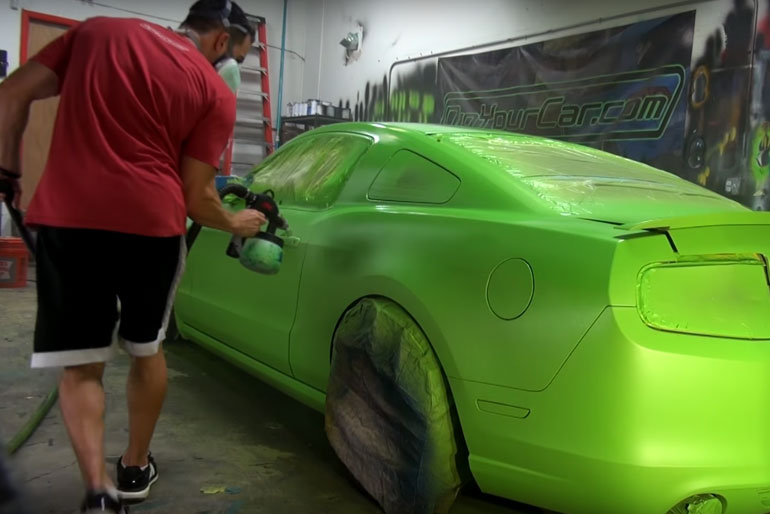
Apply The Plasti Dip
If you are applying the “plasti dip” for the first time, then you should practice it on any spare metallic sheet to get confidence first.
Take a spare metallic piece, take the spray gun, distanced it from the spare sheet of about 12 inches and slowly start the dipping with left to right continuous motion and remember only push the trigger when you are in continuous motion with an accurate speed, not to fast as it will not coat it perfectly and even not to slow that will cause a thicker layer of plasti dip that takes more time to dry and even you will run out of the paint early.
Now, after getting confidence in your work, you can apply it to your car; start your dipping process from the top roof to bottom.
Once you are confident of your work start plasti dipping your car, must keep in mind that repeat your work after every band by 30 percent. This will help you to have perfect coverage for your car and considerably a thick coat that will be helpful in the future when you want it to peel off.
Start your work from top to bottom of the car, and there must be 5 coats of your plasti dip. For hard-to-reach areas, you could apply 2 to 3 coats. Every coat must be dried first for about 30 to 40 minutes.
If you are using the prep kit, then you should apply the metallic coat first that will give the rubber surface a shiny look but remember that shiny look can never be complete to the real shiny surface of automotive paints.
Remove all the newspapers and painter’s tape before the coat dried up.
Rest Your Plasti Dip
Leave your car for at least 4 hours to dry up. Prevent any temptation that may cause damage to your dipping.
The Last Finish Touch
The last finish touch can be applied but it is not necessary. Reinstall the accessories that you’ve to remove for plasti dip.
Final Thought
Plasti dipping your car is much more easy and practical than painting your car. But never expect the appearance of the car to be as same as showroom paint. The shine will last for 3 hours if cared.